
How to Move Your Blog From Blogger to WordPress with Bluehost?
Are you considering migrating your blog from Blogger to WordPress? – Blogger is a great place to get your feet wet and start blogging. Because it is free, many users choose Blogger.com as their blogging platform of choice. However, if you are serious about blogging, you will eventually want to take the next step and find a more professional platform designed specifically for blogging.
WordPress.org is one such self-hosted platform that lets you have full control over your site, domain, and content.
Let’s look at the reasons why WordPress is worth considering:
- Thousands of free & premium themes and plugins are available for you to use with WordPress.
- You can tweak WordPress’s settings to make your website look like anything you can imagine.
- When you choose to host your website with a renowned hosting company, you can expect to receive unlimited storage, bandwidth, and support.
The possibilities are endless, and you have full control of your blog.
Now you know about the whys, let’s start with the step-by-step guide on “how to move your blog from Blogger to WordPress.
Things to Consider Before Moving a Blog from Blogger to WordPress
To begin migrating Blogger to WordPress, it’s worth taking a moment to examine the goals we need to accomplish.
How to Preserve Search Rankings and Traffic during Blog Migration?
When you transfer a blog from Blogger to WordPress, the most important thing is to ensure that all permalinks work as expected and that search traffic is transferred properly. In this blog post, we will show you how to properly redirect your links.
What to Expect from This Transfer?
Before you start transferring Blogger to WordPress, understand which data will transfer automatically and what you’ll need to set up manually on your new WordPress site.
Unfortunately, it is not possible to transfer your entire Blogger site as-is. You will need to add your blog’s style (theme, extensions, fonts, colors, widgets, etc.) separately. However, you can transfer the following data with this blog guide:
- Posts and pages
- Comments
- Categories and Tags
- Media
- Permalinks
- Authors
- Traffic
And more…
With that said, let’s get started with how to move a blog from Blogger to WordPress.
Also Read: How To Grow Your Blog – Ways to Get More Organic Visitors
How to Move Your Blog from Blogger to WordPress?
These are the steps you must follow to properly migrate your blog from Blogger to WordPress.
- Sign up with a WordPress Web Hosting Company
- Install WordPress
- Export your blog from Blogger
- Import the Blogger’s data to WordPress
- Redirect old links and traffic to WordPress
- Setting up permalinks on your new WordPress blog
- Things to do after migration from Blogger to WordPress
Let’s take a look at each of these steps one by one.
Step 1: Sign Up with a WordPress Web Hosting Company
To run a website on the internet, you will need a domain name and web hosting. For a quicker glance, a domain name is the web address of your blogs, such as trickyenough.com or Google.com.
Web hosting is where your site files are stored, typically provided by a web hosting provider that offers the storage space and technologies needed to keep your website online.
Blogger.com is a free service – your blog will be hosted on the company’s servers for free. If you want to leave Blogger and move your blog to WordPress, you’ll need to purchase hosting.
Now you might ask yourself, “How much does it cost to purchase a domain name and web hosting?”
Web Hosting
Many companies offer WordPress hosting. Many websites compare them. But before you read the reviews, we should warn you that some sites and reviews are paid for. You might end up reading fake reviews about a company that paid to be listed as the best.
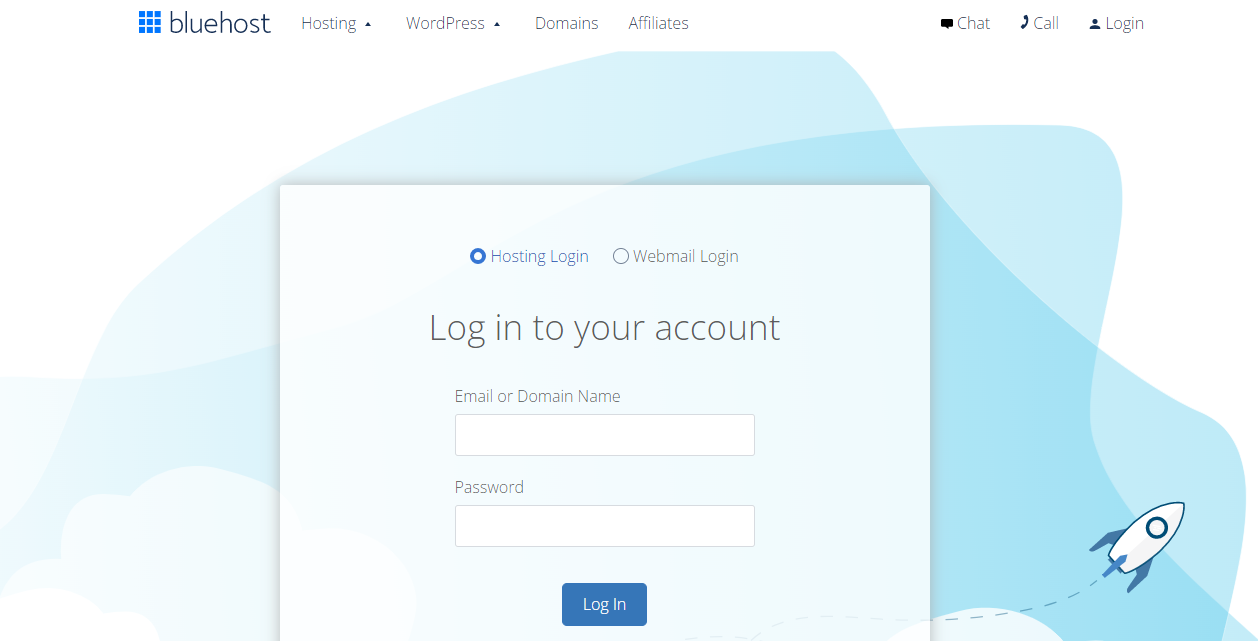
That said, we recommend using Bluehost, one of the largest hosting companies in the world. WordPress officially recommends its WordPress hosting plans.
Domain Name
If you already use Bluehost’s web hosting services, consider their domain services as well. The reason is that they give you a free domain. However, you can opt for any other domain provider as well. It’s totally up to you.
Step 2: Install WordPress
After you have signed up for WordPress hosting and domain registration, it’s time to install WordPress. If you have opted for Bluehost’s services, you can install WordPress with just a few clicks. Log in to your Bluehost cPanel account and install WordPress.
Step 3: Export your Blog from Blogger
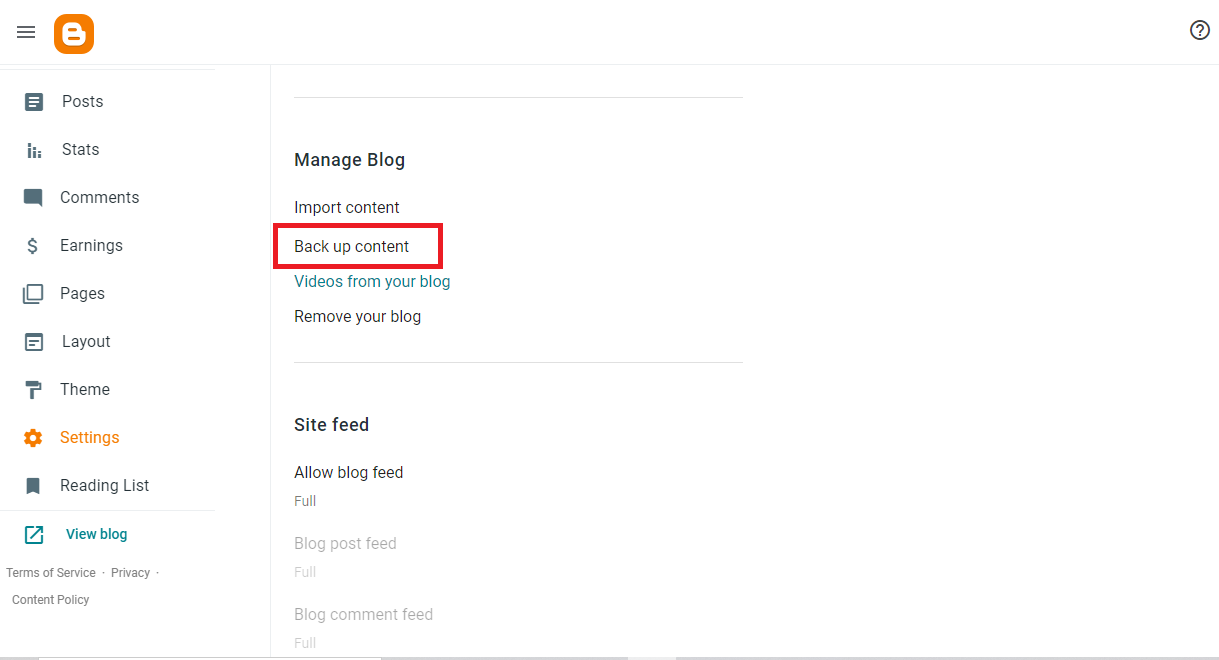
After installing WordPress, the first thing you need to do is export your Blogger content. Don’t worry! You don’t need to create files manually. With a clickable button, everything will be done in a moment.
To export, log in to your Blogger account, navigate to Settings, and select the Manage Blog section. Under this section, click on the Backup content button.
This will bring up a pop-up; click the Download button.
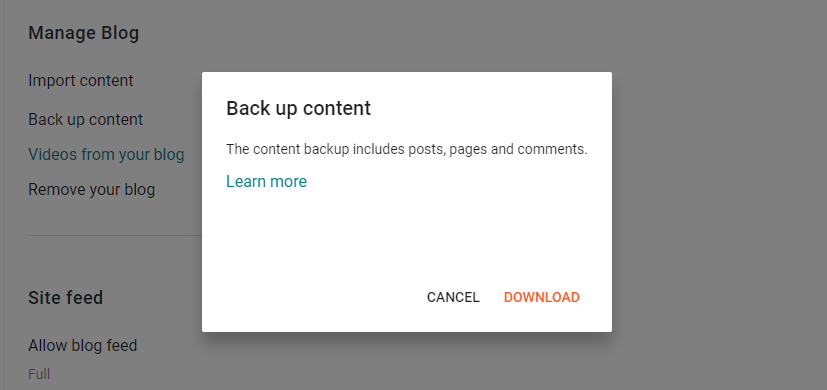
By clicking the button, Blogger will begin downloading the XML file that contains all the important data from your blog. It may be smaller or larger depending on how much content you have. A file named blog with the export date will be created.
Place the file on your desktop so you can find it easily later on.
Step 4: Import the Blogger’s Data to WordPress
After you are done exporting Blogger’s content, it’s time to import the data to WordPress. As the Blogger plugin is experiencing certain development issues, we will download a third-party plugin to import Blogger’s data into WordPress.
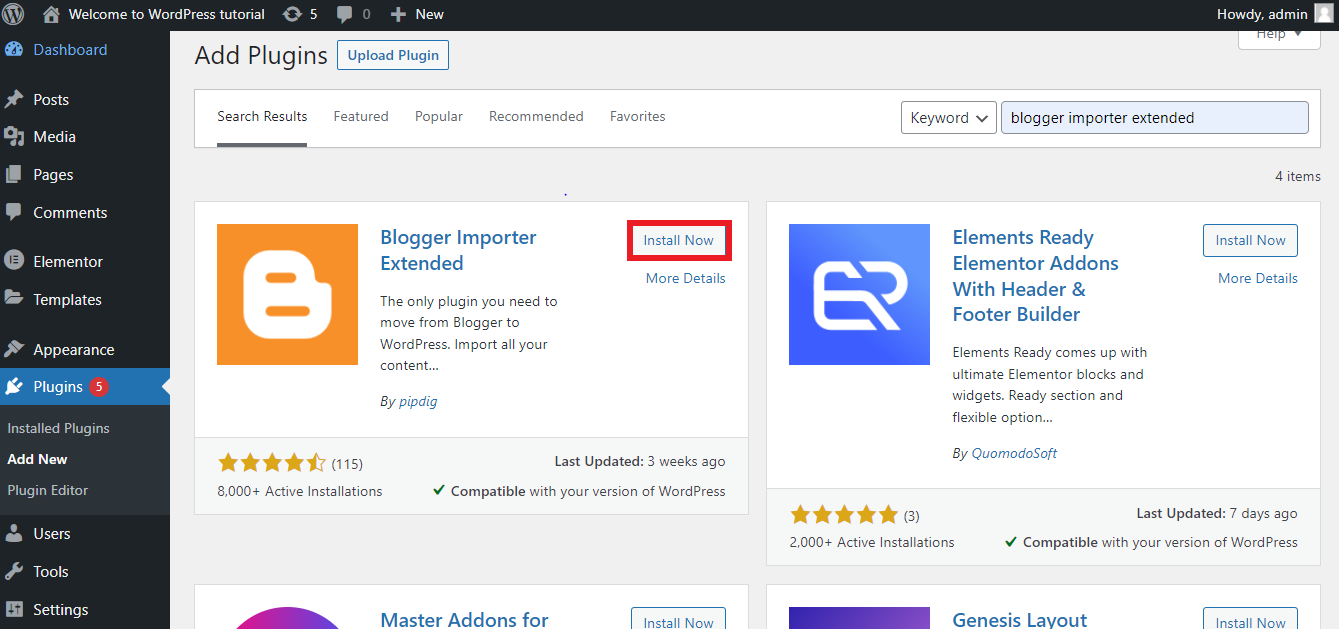
Here, we are using the Blogger Importer Extended plugin. Navigate to Plugins > Add New and download and install the plugin. Once installation is complete, activate the plugin by clicking on the Activate button.
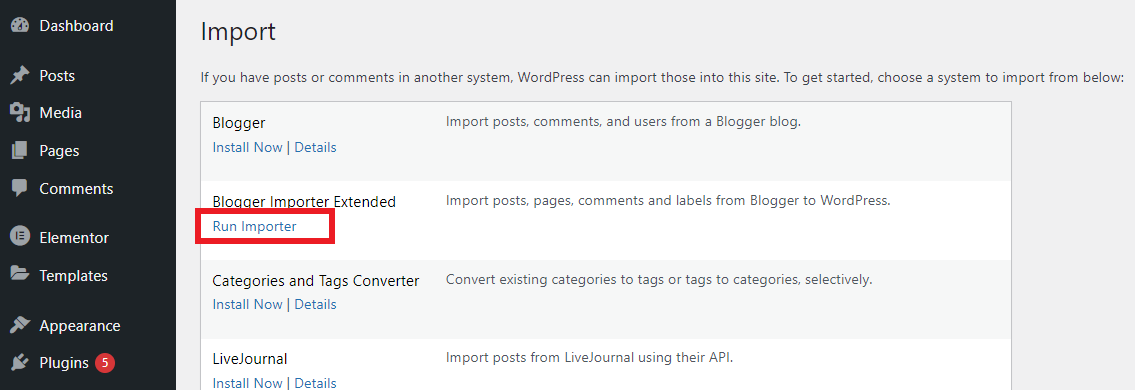
To start importing, navigate to Tools > Import. Under the Import section, find Blogger Importer Extended and click on the Run Importer link given below.
Import published posts
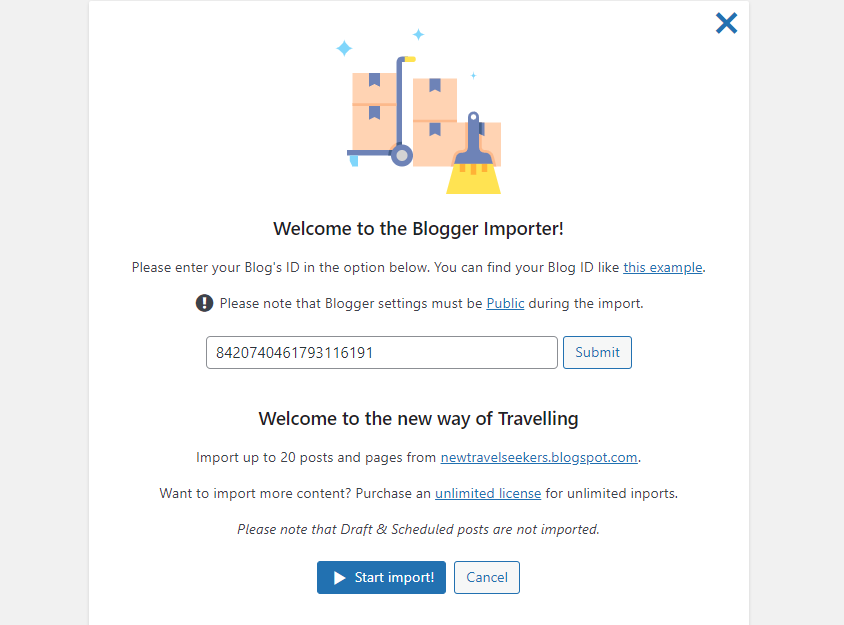
As soon as you click the Run Importer link, a pop-up will appear, displaying the conditions for the free and paid versions. Click on the 20 posts for the free button to continue.
This will take you to the next step, where you need to enter your blog post’s ID and click the Start import button.
WordPress will now start importing the file. The uploading time depends on your file size. You can import the other posts or pages similarly.
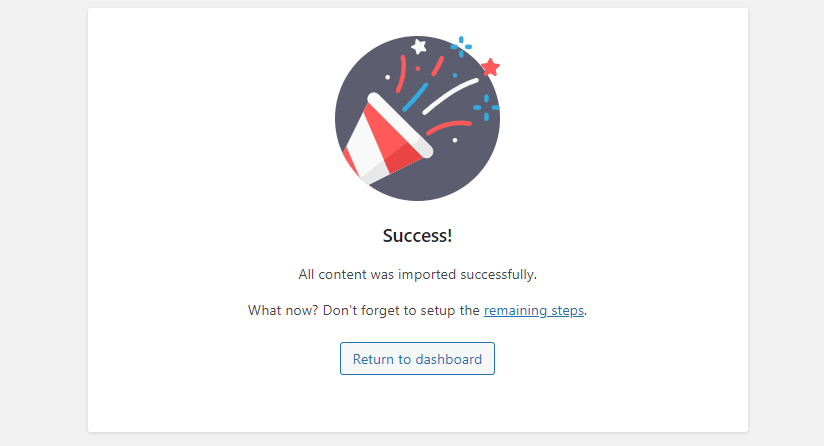
Congratulations! The file is imported successfully.
Also Read: Best Blogger Outreach Tools
To continue, click on the remaining steps link. It will redirect you to the other steps.
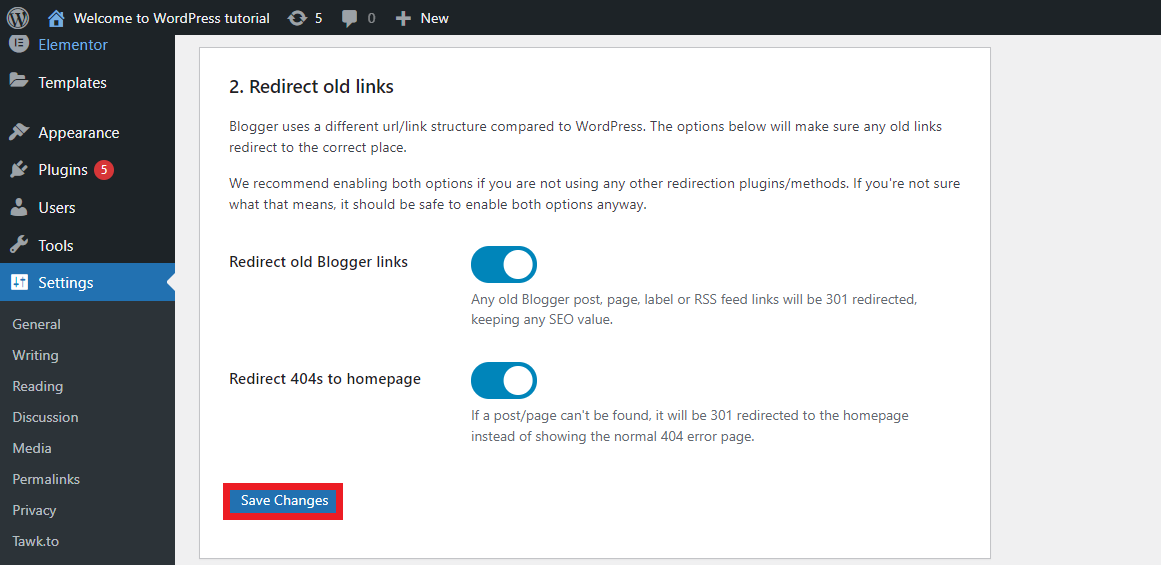
Redirect old links
Your blog has likely had some impact on search engines over time if you have been running it for a while. Therefore, it is crucial to ensure that your users land on the same page on the new site as they were trying to access the old site.
With the Blogger Importer Extended plugin, redirecting old links is very easy. Enable both options, as shown in the screenshot below, to ensure any old links redirect to the correct place.
And finally, click on the Save Changes button.
Another essential consideration, especially if you’re not familiar with technical aspects, is hiring a professional WordPress developer. These experts can streamline the migration process and ensure that your new site is designed with high performance and customization in mind, tailored to your unique needs.
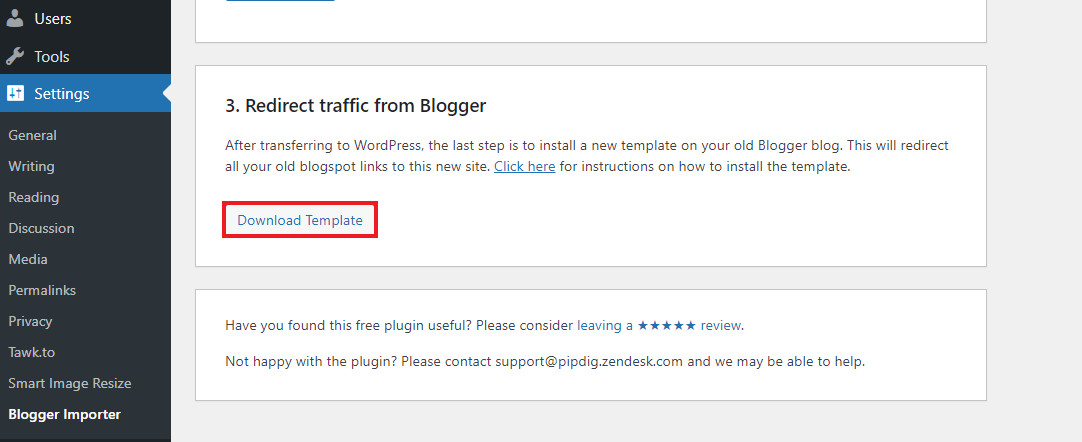
Redirect traffic from Blogger.
Setting up proper redirection is the most important step to ensuring your existing traffic and SEO rankings aren’t lost. To make this work, follow these steps:
- Navigate to Settings > Blogger Importer and find the “redirect traffic from blogger” section. Here, click on the Download Template button.
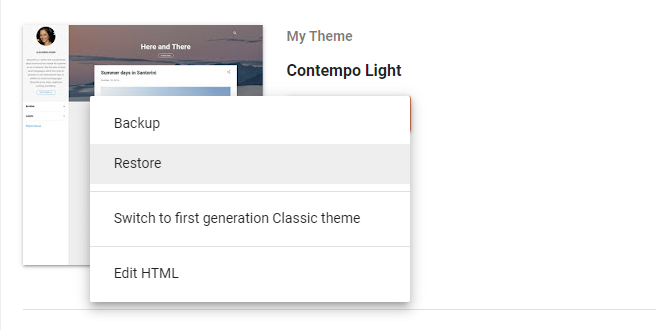
2. Now, go to the theme section of the Blogger dashboard and click on the Customize button.

3. Then select the Restore option from the drop-down arrow.
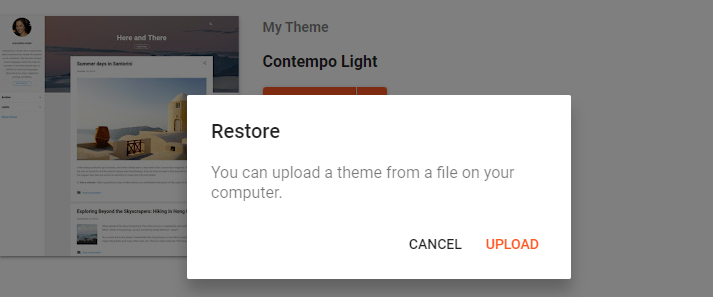
4. Click the Upload button and select the file you downloaded from WordPress.
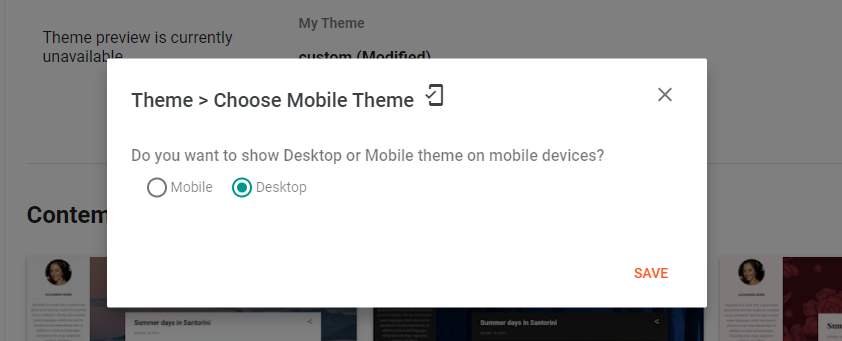
5. Now go back to the Customize button and select Mobile Settings.
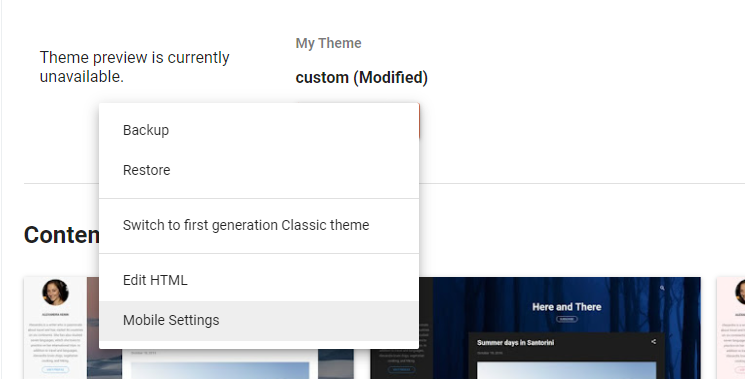
6. Select Desktop and click the Save button.
That’s it! Now you don’t need to worry about your visitors. This will redirect all your old blog post links to this new WordPress site.
Step 5: Setting up permalinks
After successfully importing the content, you are one step closer to adding the entire Blogger blog to your new self-hosted WordPress site. The next step is to set up the permalinks, an essential part of WordPress management.
Permalinks are unique addresses for posts, pages, files, and other content on your website. Each permalink must be unique for your site to work correctly.
Also Read: Reddit For SEO – Know How To Start Promoting Via Reddit
Do you know Blogger uses a specific pattern to distinguish permalinks?
For example, if you go to any of your Blogger’s posts, it will look like this, https://newtravelseekers.blogspot.com/2021/12/travel-1.html
To keep things organized, we suggest changing the WordPress permalink structure to match Blogger’s as closely as possible.
To set up the permalink in WP, go to Settings > Permalinks and choose the same pattern as shown in your Blogger’s post.
For example, here we choose the Custom Structure option and use the year & month tags from the available tags option to match the pattern. And finally, click on the Save Changes button.

Things to Do After Migrating from Blogger to WordPress
If you followed the instructions in this tutorial, you successfully transitioned your blog from Blogger to WP. Well done! We advise you to run several tests to ensure everything went as planned.
Visit any of your older Blogger posts and try reloading them to accomplish this. You should be redirected to the relevant WordPress post if everything went smoothly.
Please ensure there are no issues, you can consider viewing another few posts and repeat the test. Return to the Redirect page and double-check everything you have done if you aren’t being automatically redirected.
What about my images?
WP will immediately import your images to the Media Library. Any images in the original post will still be available on your updated website. However, if they are not imported or linked correctly, you can easily fix that. But first, look through your media library before you begin to worry.
So, that’s all about migrating blogs from Blogger to WordPress without affecting your SEO and Google rankings! Hope this article guides you as simply as possible.
Let me know in the comment section below if you have any doubts!